My sweet granny is now an angel.
As I mentioned in an earlier post, my maternal grandmother has been fighting lung cancer for the last (almost) four years. She fought it as hard and as long as she could, but she lost her battle on Thanksgiving day, at two o'clock in the afternoon. She went to meet Jesus the way she would have wanted to... at home, surrounded by her family, with her daughter and twin sister right by her side. We are sad for us, but we are so happy for her. She is no longer in pain, she is no longer broken, she is no longer scared or confused. She is whole.
In late August, she went on hospice. At that point, they were saying she would only be with us for a few more weeks... she showed them. She got over a little hiccup and started doing better. By September, she was planning a little baby shower for our family. She helped where she could, but was tired a lot of the time. She had started to decline again at this point, but she held on for that baby shower. She was so excited about our baby girl. I'll never forget her face when we told her we were expecting, when we showed her that first ultrasound... pure joy. After the baby shower, her health really took a turn for the worse. She slept more, ate less, and we all knew it wouldn't be much longer. Last weekend, she had to be catheterized, because she could no longer leave her bed. On Monday, we were told she didn't have much time left. Her 70th birthday was on Tuesday. At that point, she was sleeping most of the day and not eating at all.
Thursday morning, I was woken up by a phone call. My sister was on the other end; she was crying. I knew immediately. My mama didn't want to tell me, she was afraid for mine and baby girl's safety, but my sister knew I would want to be there. Granny had taken a turn for a worse during the night, and they were saying she probably wouldn't make it through the day. We got up and got ready, went and picked up my brother and sister (my parents didn't want them driving), and went to her house. At that point, I still thought she was going to pull through. She'd beaten every timeline, every time.... but when I saw her, I knew. We got to her house at 1:50 pm, she passed away at 2:00 pm. I know she was waiting on us to get there.
As selfish as it was, all I could think about was how she would never meet my baby girl. When I tearfully admitted this to Ty, he told me that now our sweet girl has a gaurdian angel, and in my heart, I knew it was true. Before they took her away, I got to tell her I loved her one last time, and I asked her to watch over our sweet girl... and I know she will. One day, I will get to tell our girl about her beautiful gaurdian angel... how she never met her, but loved her so much.

11.30.2011
11.16.2011
pumpkin cheesecake (and an apology)
*I apologize for not posting a hair accessory tutorial yesterday... being 35 weeks pregnant got the best of me... but I'm working on one right now that will be posted later today!*
I love pumpkin. anything. No really, anything. If it has pumpkin in it, I'm going to love it, period. I also love a good cheesecake.... so a few years ago I added pumpkin to my cheesecake recipe, and it was delicious. So much so that I make it every year for thanksgiving, and I'm often asked for the recipe. So, this is my gift to you... pumpkin cheesecake. Make it. You'll love it, I promise!
pumpkin cheesecake
Ingredients:1 c. canned pumpkin
3 8oz packages of cream cheese (softened)
2 tsp vanilla
1 1/2 c. finely crushed graham crackers (cinnamon flavored works well)
1/3 c. sugar
3 eggs
1/3 c. melted butter
2/3 c. brown sugar
1/2 tsp. cinnamon
Preheat oven to 325 degrees. Mix graham crackers, sugar, and melted butter in med. bowl. Press into 8-9 in round pan, covering bottom and sides. ( I think you're suppossed to use a springform pan to make cheesecake, but I've always used a regular pan and it turns out fine.) Bake for 7-8 mins.
While crust is baking, beat cream cheese (med- high) in LARGE bowl until smooth. Add pumpkin, brown sugar, vanilla, and cinnamon. Beat (med) until mixed well. In a small bowl, wisk eggs together. Fold into cream cheese mixture, a little at a time.
Pour filling into crust. Place cheesecake pan into a baking pan, and fill baking pan with water until halfway up cheesecake pan. (makes a difference, I promise!) Place in oven and bake abt an hour or until center is slightly jiggly. :)
The water makes the pan really heavy and sloshy (especially after baking) , so be prepared.
Remove from water bath and cool on wire rack at least 1 hour.... I usually do 1 & 1/2 hours. Cover and refrigerate at least 4 hours or until center is firm.
I used to make a pumpkin glaze to drizzle over it, but smuckers sells a pumpkin syrup ice cream topping thing that is frankly just as good when heated, so I usually use that now instead... but cheesecake is totally yummy eaten plain, too.
... now go grab a cup of coffee and enjoy!
11.14.2011
boutique-style hair bows
We had a small baby shower for baby girl on Saturday with my immediate family... and goodness, she already has so much stuff (and we have another baby shower next Sunday)! I was going through it all and trying to get organized, and the one thing I noticed she didn't have enough of was... hair accessories! I know, it seems silly when there are diapers and wipes and bottles to worry about, but every little girl needs cute hair accessories, right?! So... I've decided this week is going to be pretty hair accessories week on the blog! Each day I'll be posting a different hair-inspired tutorial, so make sure you check back daily!
Today's tutorial is....


Today's tutorial is....
boutique-style hair bows

To make one bow, you will need:

- 38 inches of 2 inch wide grosgrain ribbon
- one double prong clip (or other clip variety)
- hot glue gun and hot glue
- needle and embroidery thread
- ruler
- marker
Start by laying out the 2 inch wide ribbon. Measure 4 inches, cut, and set aside. That should leave you with 34 inches of ribbon. Measure 4 inches again and use your marker (you'll want to use a marker so that it bleeds through to the back) to make a dotted line along the width of your ribbon. This will be one of the tails.

Now measure 6 inches from your dotted line. Make another dotted line along the width of your ribbon. Repeat three times for a total of four 6 inch sections. These sections are going to be the loops.

After marking your first 4 inch section and the four 6 inch sections, you should have one more 4 inch section left. This section will be the other tail.

Now, take your needle and embroidery thread (if you don't have embroidery thread, you can use regular thread, but I like how embroidery thread makes the bow a little sturdier) and sew a running stitch along the dotted line at the first 4 inch mark. Make sure you double knot the end of the thread so it doesn't pull through.

Remember when I said you wanted your marks to bleed through to the back? This is where that's going to come in handy. Fold the first 6 inch section so that the back is facing up. You should still be able to see your dotted line. Sew a running stitch along that dotted line.

Now fold the next 6 inch section so that the dotted line is facing right side up. Sew a running stitch. Keep alternating this way until you've sewn a running stitch along all of your dotted lines. You should have something that looks similar to this:

With the needle still attached, pull the thread so that it gathers up the ribbon. Try to keep all right sides facing up as you gather.

After you have pulled the thread tight, wrap it around the center twice and put a stitch right through the middle to secure your bow.

Clip the tails into an angle or a split. I like the split look, but it's up to you. Make sure you fray check or heat seal the clipped ends so they won't ravel. Now, take that 4 inch piece you set aside earlier. Fold it into thirds lengthwise and tie a loose knot. Make sure the knot is facing up on the fold.

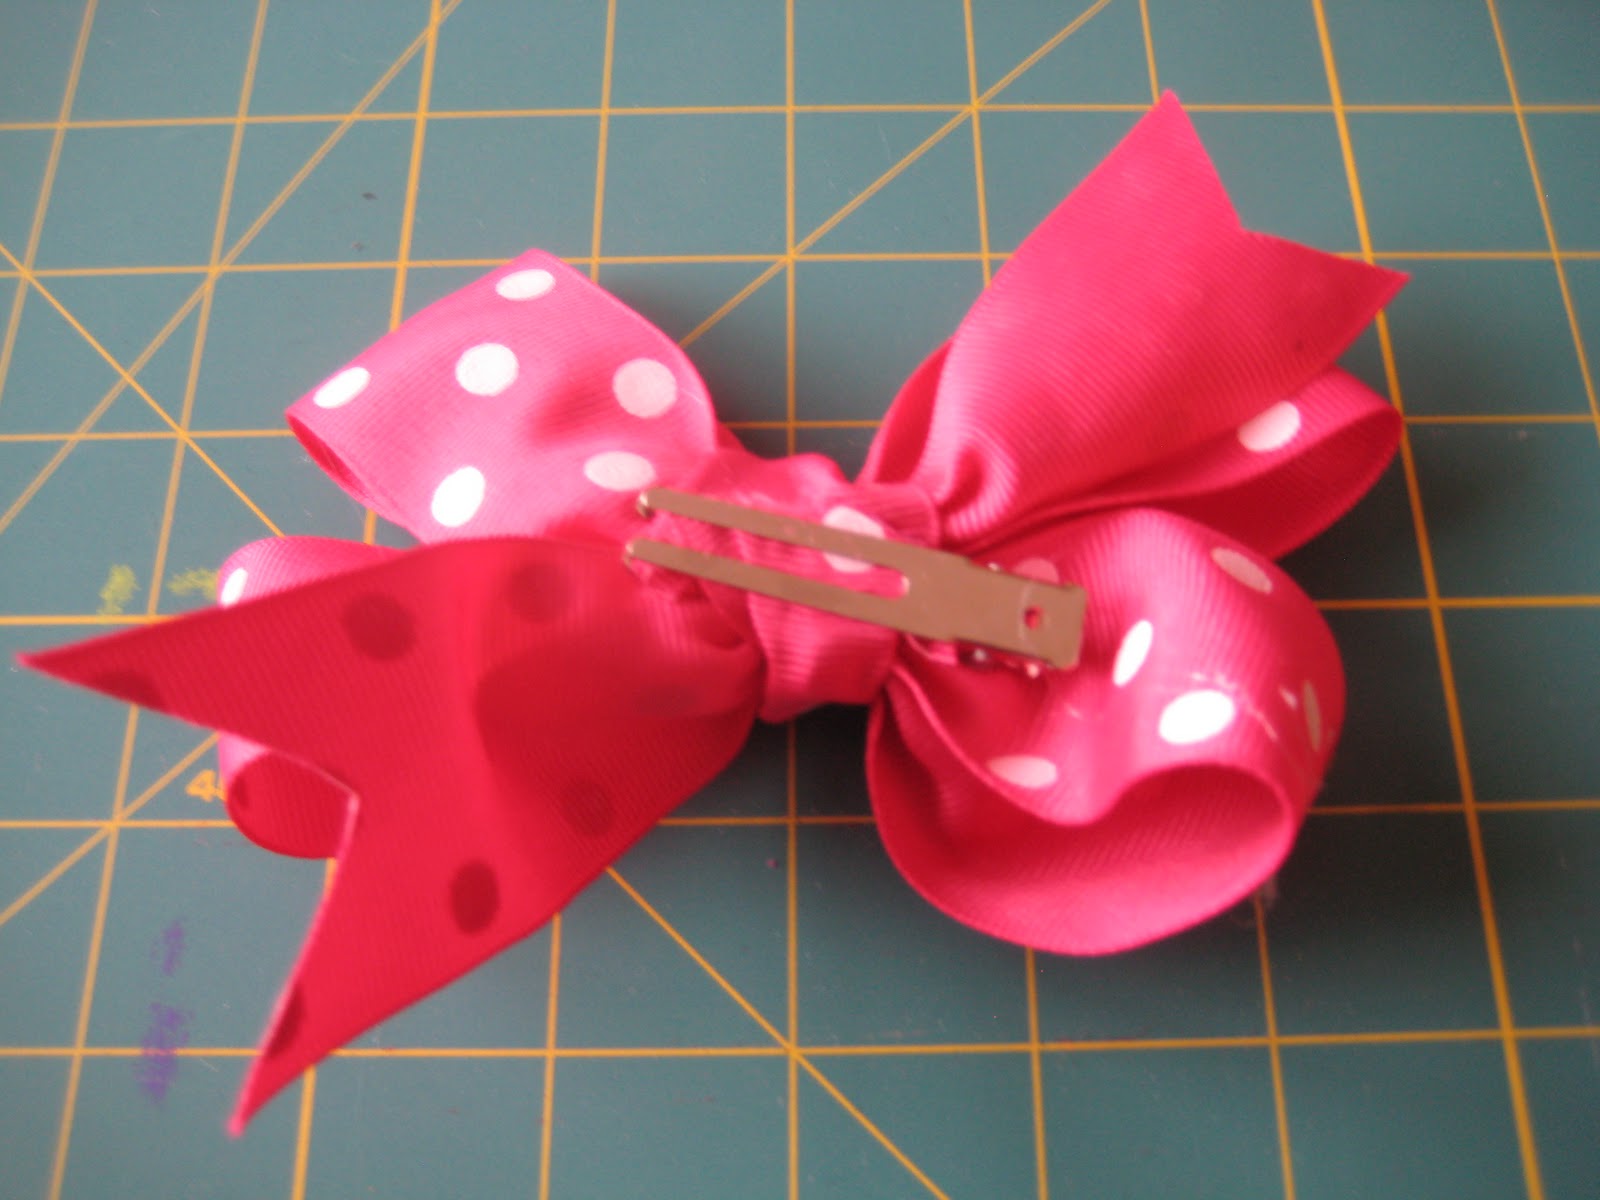
Put a dab of hot glue directly onto the back of your knot. Place the knot directly onto the front center of your bow, making sure to cover up the embroidery thread.

Flip your bow over. Now take your clip and line the front with hot glue. Make sure not to over glue... you still want to be able to open the clip! (I used a double prong clip, since my bows will mostly be clipped to headbands and hats for now, but if you are making these for an older girl with more hair to snap into, you may want to use one that snaps.) Place the clip face down over the center of the back of the bow.


Holding the clip open, wrap one of the knot ends around and hot glue it down. Trim off the excess. Repeat with the other knot end.
Flip it over and you're finished! You can make a few variations on these by using a coordinating ribbon for the knot instead of a matching ribbon, like on the pink stripe bow below.

Once you get the hang of it, they only take a few minutes a piece to make, and before you know it, you'll have a ton of pretty bows... plus its a really cute, inexpensive way to accessorize a special little lady.
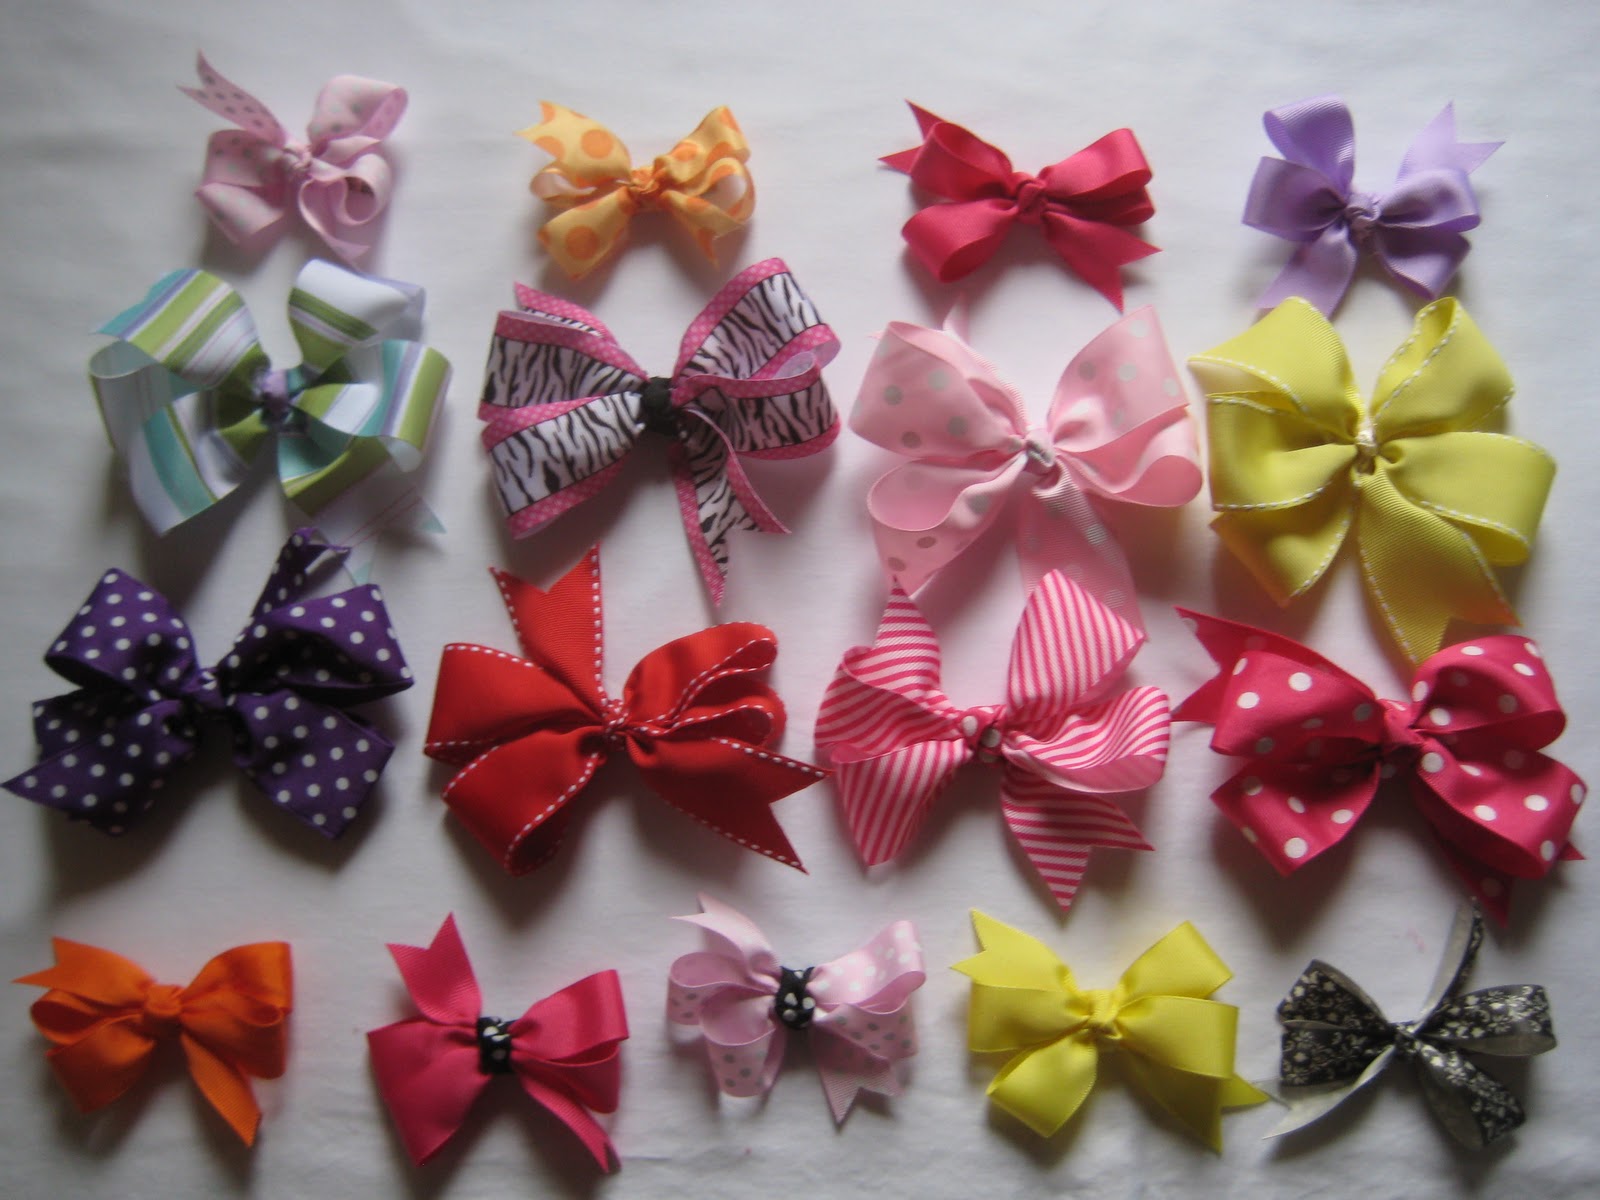
*To make the smaller bows shown above, use a 20 inch long piece of 1 inch wide grosgrain ribbon and follow the directions above, substituting 2 inch sections for tails and 4 inch sections for loops.*
Enjoy your cute new inexpensive boutique-style bows, and make sure to come back tomorrow for the next installment of pretty hair accessories week!
11.13.2011
last day...
... For the grand opening sale in the shop! Use coupon code "GRANDOPENING" to receive 10% off your total purchase! Thanks for checking us out!
11.10.2011
flag bunting pillow
I love flag bunting... it's just so fun and happy. I'm using it on everything these days... decorating, wedding, design, you name it. I recently made this cute little pillow to add to baby girl's nursery.
(Sorry for the wierd shadow... I guess I wasn't paying much attention when I took this picture... we'll blame it on pregnancy brain. ;) )


(Sorry for the wierd shadow... I guess I wasn't paying much attention when I took this picture... we'll blame it on pregnancy brain. ;) )


I embroidered the year on the back using a simple back stitch. It was so easy and I just love how bright and cheery it is. Hopefully baby girl will love it one day too!
11.08.2011
new in the shop
new in the shop....
Collegiate Ruffle Bottom Necklace Onesies... fully customizable for your favorite team!


Collegiate Ruffle Bottom Necklace Onesies... fully customizable for your favorite team!


Don't forget about our discount... 10% off your total purchase now through November 13th with coupon code "GRANDOPENING"!
the right pair of shoes
I'm obsessed with shoes. I always have been. I remember the first time I saw dress-up shoes in the store when I was little (you know, the plastic ones with the low heel?). They didn't make them in my size, but I begged and begged for them, and finally my mama gave in and bought them for me. They were three sizes too big, not even remotely real shoes, but I wore them EVERYWHERE. I felt so glamorous and grown-up! Since I love pretty shoes so much, it's only natural that I would want my baby girl wearing cute shoes, too right?!
So... I made these for her!


So... I made these for her!


I'm still perfecting the pattern for them... just a few more tweaks to make... but when it's perfect, I'll be offering more cute little baby shoes in the shop.
Just remember...
"Give a girl the right pair of shoes, and she can conquer the world." -Marilyn Monroe
11.07.2011
the "accidental" baby
No pictures or fun projects to share today (although, if you come back tomorrow I'll be posting a few fun little projects I've completed for baby girl and a quick tutorial)... just going to be real for a minute.
Someone recently made a comment to me about my baby being an "accident" and that I "should have been more careful", and it's stuck with me since then. Now, I know some people have very strong opinions about babies that are born outside of marriage... and admittedly, at one time in my life, I was just as judgemental of another as this woman was of me, but my heart has dramatically changed.
To "accident lady":
Our sweet little girl was NOT an accident. Although her daddy and I did not plan her little life, her maker did. Although my plan for my own life did not even involve children of my own, God's plan for my life did. There are so many terrible things going on in this world, in my own world even, and I truly believe that this little angel was sent to us to bring my family joy in a time of great sorrow. You see, my sweet granny is dying. She may not even make it to meet my little girl. She has been battling lung cancer for over three years, and she is in the final stages of her disease. She is no longer herself; the cancer and the medicine she has to take to try to alleviate some of her pain has seen to that. She is confused and scared. All we can do is watch and try to make her comfortable and remember that her true self is already gone. While one life can never replace another, my daughter has brought our family together. She has brought joy, peace, and love. She is a reminder of all that is good, when everything seems so bad. How can that be an accident?
My favorite verse has always been this:
"For I know the plans I have for you," declares the Lord, "plans to prosper you and not to harm you, plans to give you hope and a future." -Jeremiah 29:11
... and with such proof as that, how can any life be considered an accident?
11.03.2011
handprint quilt
While getting things organized here, I'll be bringing over a few posts from an old blog.
*UPDATE: I think I want to do something similar to this for baby girl's first year... maybe her hand and feet prints every month for her first year... I think it would be super cute in all black and white!
While I was on vacation, I woke up one morning with an idea in my head. I grabbed the hotel notepad, sketched it out, and went back to sleep. Fast forward a few weeks, and you've got this cute little handprint quilt!

I LOVE the way it turned out. I simply cut twelve 10" x 10" white blocks, and had each of my kids put their handprints on one of them in acrylic craft paint. I suppose I could have used fabric paint, but acrylic won't wash out and I had it on hand. I let each child write their name under their handprints with a paint marker (also will NOT wash out... learned that the hard way!). For the in between (can't think of the real word off the top of my head, but you know what I'm talking about!), I chose something that was cute, but still gender neutral. I cut a ton of 5" x 3" pieces and stitched them together for a patchwork look. I love that each child had a part of making something lasting, that I can take with me from my sweet little class this year.
On the twelfth block, I added a title and a sweet little handprint apple.
I'm a little crazy about handprints... you can make anything out of them! For the apple, simply paint the palm red and press. Paint the pinky brown and press on top for the stem. For the leaf, paint the thumb green and angle next to the stem, and voila! handprint apple!

It's perfect for lying on your belly in the grass with a book, (by Dr. Seuss of course!)

eating a yummy, healthy snack picnic style,

or just looking at!


Such a sweet little quilt, made with the help of a sweet little class!
11.01.2011
new in the shop... and a discount!
I've added a few new items to the shop:
... and to celebrate this new blog and our shop opening, I'll be offering a 10% discount on your total purchase from now until November 13th! Just use the coupon code "GRANDOPENING" at checkout!
Thanks for taking a look!
... and to celebrate this new blog and our shop opening, I'll be offering a 10% discount on your total purchase from now until November 13th! Just use the coupon code "GRANDOPENING" at checkout!
Thanks for taking a look!
refashion: men's polo shirt to baby dress
Want to go from this:


Set it aside, and start on your pattern pieces. You'll need a onesie or dress in the size you are wanting to make. This isn't an exact science... there's a little bit of guess work involved (especially if your babe is still in your belly!), but it's pretty simple. Take your onesie or dress and fold in half longways. Place the fold along the edge of your paper and trace around the collar (Make sure you trace the different openings for the front collar and back collar) to the seam of the top of the sleeve, then from the seam at the bottom of the sleeve to the point you want the bodice to end. I stop about an inch below the bottom of the sleeve, but you can adjust that according to the size you are making and your personal preference.


to this?

Start with a polo shirt. I always use a men's shirt because they are bigger... the bigger the shirt is, the more material you have to work with, and the more you have leftover for additional projects, embellishments, etc. I've never used anything less than a men's medium, but I try for XL or larger. You can use an old one passed down from a man in your life (baby girl has dresses made from her daddy's shirts and her uncle's shirts) or one you found at the thrift store for fifty cents. If you are getting your shirt from the thrift store, I have a few words of advice: 1. Don't overpay. Goodwill and "chain" thrift stores usually charge between $3 and $5 per shirt. Don't pay that! If you have to go to goodwill, wait until their dollar days, when you can find them for a dollar and stock up. If you can, go to a "mom and pop" thrift store. The shirts there are almost always $1, and I've found a few on sale for $.50... and they usually have a better selection. 2. Check the armpits. That sounds disgusting, I know... but do you really want to dress a little girl in sweat stains? I only buy shirts with the tags still attached or that show little to no signs of wear... otherwise it's not worth it to me.
Now that you've got your shirt, wash it in hot water and dry it. Then, break it down by cutting along all the joining seams... no need to use your seam ripper, just clip right beside the seam. IMPORTANT: Do NOT take out the hem or the sleeve hem. Just the joining seams. I like to cut out the placket as well, because it's porportionally too large to use on a little dress, and is otherwise useless... I do save the buttons and the collar, though this is completely optional. When you finish breaking your shirt down, you should have something that resembles this:

Set it aside, and start on your pattern pieces. You'll need a onesie or dress in the size you are wanting to make. This isn't an exact science... there's a little bit of guess work involved (especially if your babe is still in your belly!), but it's pretty simple. Take your onesie or dress and fold in half longways. Place the fold along the edge of your paper and trace around the collar (Make sure you trace the different openings for the front collar and back collar) to the seam of the top of the sleeve, then from the seam at the bottom of the sleeve to the point you want the bodice to end. I stop about an inch below the bottom of the sleeve, but you can adjust that according to the size you are making and your personal preference.

Remove the onesie and connect from the top of the sleeve to the bottom of the sleeve. I just eyeball it based on the way the sleeve is connected on the onesie. Use a grid to add a 1/4 inch seam allowance to joining seams. Make sure you don't add to the collar or to the sleeve. You're now finished with your bodice pattern!
Now, place your folded onesie on the edge of another piece of paper. Make a mark at place you stopped for the bodice piece. Decide how wide you want your skirt to open at the bottom and half it. I like for mine to be twelve inches, so I measure out six inches. Make a mark somewhere near the bottom of your paper, and use a ruler to diagonally connnect the top mark to the bottom mark. Now decide how long you want your skirt. This is completely up to you, but I like to go three inches below the bottom of the onesie... shorten or lengthen based on size and personal preference. Using a ruler, draw a straight line from the edge (where the fold was) out to the width mark. That's your hem. Now, use your ruler to add a 1/4 inch seam allowance to the side seam as well as the top seam. Do NOT add to the hem... and your skirt pattern is finished!

Now for the sleeve pattern. You'll need the same piece of paper you drew your bodice pattern on. Place the seam of the sleeve of your onesie along the sleeve seam you drew on your pattern. Trace the sleeve. Add a 1/4 inch seam allowance to the joining seam of the sleeve... and your sleeve pattern is finished!

Now cut out your pattern pieces and you should have three pieces that resemble this:

The hardest part is over! Now use your pattern pieces to cut out your fabric (you'll need two of each piece). I like to start with the skirt first. Fold the body of a shirt piece in half and place the fold edge of your pattern along the fold and the hem edge of your pattern along the hem. Pin in place and cut. Repeat.

I like to cut the bodice piece along the same fold right above the skirt, so that I don't have to unfold and refold. Make sure that when you are cutting the bodice piece, you cut a piece with a front collar and a back collar. 
Now grab the sleeve you cut from the shirt and the sleeve pattern piece. Fold the sleeve piece of the shirt in half (making sure to line up the sleeve hem) and place the fold part of the sleeve pattern piece along the fold and the hem part of the sleeve pattern piece along the hem of the sleeve. Pin in place and cut. Repeat on the other sleeve. Now take one of the scraps and cut a 2 inch by 18 inch strip. We will use this to finish the collar. Save the rest of the scraps for embellishments or other projects.

Now that you have all your pieces cut out, you are ready to assemble! (Here I switched to some pieces I had previously cut out... I ran out of green thread!) I like to start with the skirt. Take your two skirt pieces, pin right sides together, and serge or zig-zag the sides. Make sure to leave the top open! Turn right sides out and press the seams.

Set the skirt to the side. Take your two bodice pieces, pin right sides together, and serge or zig-zag only the shoulders and the sides. Make sure to leave the sleeves, collar, and bottom open! Turn right side out and press the seams.

Now for the sleeves. Fold right sides together and serge or zig zag only the bottom seam that forms the sleeve... make sure you leave the side seam where sleeve and bodice come together open! Turn right side out and press. Now to join the sleeves to the bodice. Start with both pieces right side out and line up the bottom sleeve seam and the side bodice seam. Pin.

Now fold the bodice piece inside out over the sleeve piece and pin all the way around the sleeve. Serge or zig-zag. Repeat for the other sleeve, then turn and press.

Now for the binding strip... take the 2"x18" strip, fold in half longways and press. Now fold each half in half longways and press. Now fold back over and press. You should end up with a 1/2 inch by 18 inch strip. Pin that strip all the way around the collar and topstitch in place. You're finished with the bodice! Now you should have two pieces that resemble this:

Now switch to an elastic bobbin. (You can continue with a regular bobbin by doing a gathering stitch and then stitching in place, but it's so much simpler with the elastic bobbin and it makes for stretchier dress.) Pin your openings right sides together and stitch. Iron over the elastic to help it draw up. Turn your dress right side out and you're finished! You can leave it plain, or use scraps to embellish.

You can do a flower.

You can do a ruffle.

You can even do both.

You can even use the scraps to make matching headbands!


... and pretty soon you'll have a whole cluster of inexpensive, repurposed, adorable handmade dresses for a special little lady.

Subscribe to:
Posts (Atom)